Gold Text Effects: Elevating Your Designs with Luxury and Precision
In the crowded digital landscape, visual hierarchy is everything. You have mere seconds to capture attention, and nothing commands authority quite like the allure of gold. Gold Text Effects are not merely a stylistic choice; they are a strategic tool for conveying value, prestige, and high quality. Whether you are designing a cinematic title, a luxury brand logo, or a sophisticated social media banner, the right metallic finish can transform a flat design into a tangible experience. However, achieving a realistic, high-end look is often more complex than it appears. Many creators stumble not because they lack creativity, but because they overlook the technical nuances that separate amateur graphics from professional-grade assets.
The Trap of Flat Metallic Colors
One of the most common mistakes beginners make is assuming that a yellow or orange gradient equals gold. This is a fundamental misunderstanding of how light interacts with metal. Real gold is reflective, complex, and deeply influenced by its environment. When you rely on simple color overlays without proper texture mapping, your text looks plastic rather than precious. This "flat gold" effect can cheapen your brand perception, signaling to your audience that the product or service lacks attention to detail.
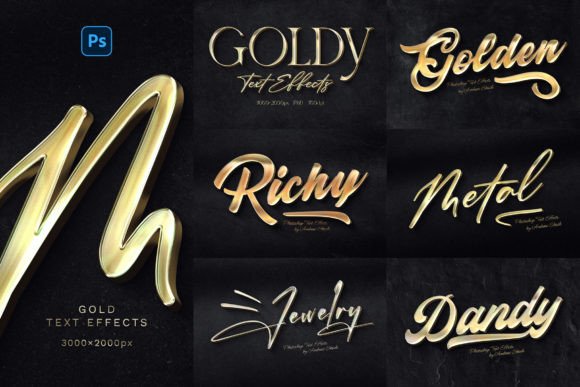
To avoid this, you need designs that incorporate realistic lighting physics. High-quality Gold Text Effects Metal templates utilize advanced blending modes and shadow dynamics to mimic real-world reflections. By using a template that includes long shadows on dark wall textures, you create depth and contrast that make the gold pop. The darkness of the background serves as a canvas, allowing the shining gold effects to stand out with maximum impact. This contrast is crucial for readability and aesthetic appeal, especially on smaller screens like mobile devices where subtle details can easily get lost.
Ignoring Resolution and Scalability
Another critical oversight is neglecting resolution requirements. A design that looks crisp on your desktop monitor may appear pixelated and unprofessional when printed on a flyer or displayed on a high-resolution 4K monitor. Many free or low-quality resources offer files at 72 DPI, which is suitable only for web previews, not for final production. Using these for print materials results in blurry edges and a loss of that sharp, luxurious feel.
When evaluating a resource, always check the technical specifications. You should be looking for files that are at least 300 DPI and sized appropriately for your needs, such as 3000×2000 Pixels. This ensures that your text remains sharp whether it is scaled down for a business card or used as a large website banner. Working with high-resolution smart objects allows you to resize your design without degrading quality. This flexibility is essential for entrepreneurs and marketers who need to repurpose content across various platforms, from YouTube covers to physical posters.
Overlooking Editability and Workflow Efficiency
Time is a valuable resource, yet many designers waste hours trying to manually recreate complex lighting effects. They struggle with layer styles, masking, and blending options, only to end up with inconsistent results. This inefficiency not only costs time but also leads to creative burnout. The misconception here is that using pre-made templates limits creativity. In reality, well-organized templates enhance it by handling the technical heavy lifting.
A superior approach is to use Smart Objects. These allow you to place your design—whether it is a text layer, vector shape, pixel layer, or even a folder group—into a predefined container. The template automatically applies the gold texture, lighting, and shadows to your content. This means you can swap out text or logos in seconds while maintaining a consistent, professional look. Look for templates that feature well-organized layers and clear labeling. This structure makes it easy to edit specific elements without breaking the overall composition. For instance, if you want to adjust the intensity of the shine or the length of the shadow, a well-built PSD file will have these controls easily accessible.
Neglecting Typography and Font Pairing
Even the most realistic gold effect cannot save poor typography. A frequent error is choosing fonts that are too thin or overly decorative, which causes the metallic texture to break up and lose its coherence. Gold effects work best with bold, substantial typefaces that provide enough surface area for the light reflections to play across. Thin lines may disappear into the background or look jagged when the texture is applied.
Before you begin designing, consider the font’s weight and structure. Serif fonts often convey tradition and elegance, while sans-serif fonts can offer a modern, sleek luxury. Most high-quality template packages include a help file with Free Font Download Links. Utilizing these recommended fonts ensures that the designer’s intended vision is preserved. If you choose to use your own font, test it within the smart object first to see how the texture maps onto the letterforms. If the details are getting lost, switch to a bolder weight or simplify the design.
What to Check Before You Download or Buy
Not all templates are created equal. To ensure you are getting a tool that truly enhances your workflow, verify the following features before making a decision:
- File Format and Compatibility: Ensure the files are in PSD format and compatible with your version of Photoshop. Check if they require specific plugins or newer software features.
- Layer Organization: Look for descriptions mentioning "Well Organized Layers." Chaotic layer structures make editing a nightmare and increase the risk of accidental deletions.
- Included Assets: A comprehensive package should include multiple variations. For example, receiving 6 PSD Files allows you to choose different angles, lighting setups, or background textures. Additionally, having 6 JPG Example Images helps you visualize the final output quickly.
- Documentation: A PDF help file with video instructions is invaluable, especially for beginners. It bridges the gap between having the tool and knowing how to use it effectively.
- Versatility: Confirm that the template works with various input types. The best tools accept text layers, vector shapes, and pixel layers, giving you the freedom to design logos, icons, or complex compositions.
Maximizing the Impact of Your Design
Once you have selected the right template, focus on the context of your design. Gold text effects are powerful, but they should be used purposefully. Overusing gold can lead to visual fatigue. Instead, use it to highlight key information—such as a headline, a call-to-action, or a brand name. The contrast between the shining gold and the dark wall texture creates a focal point that guides the viewer’s eye exactly where you want it.
Consider the platform where your design will live. For a Facebook cover or YouTube banner, ensure the text is centered and large enough to be read on mobile devices. For a cinematic title or movie title, you might want to experiment with motion blur or additional glow effects to enhance the drama. The flexibility of smart objects allows you to tweak these elements without starting from scratch.
Ultimately, the goal is to create a seamless blend of technology and artistry. By avoiding common pitfalls like low resolution, poor font choices, and inefficient workflows, you can leverage Gold Text Effects to elevate your visual communication. Whether you are a freelancer pitching to a high-end client or a small business owner creating your first ad campaign, these tools provide the professional polish needed to stand out. Remember, luxury is in the details. By choosing high-quality, editable, and well-structured templates, you ensure that every pixel contributes to a message of excellence and sophistication.